Showing posts with label projects. Show all posts

Wednesday, September 15, 2010

Among other things, this makes me want fall to come!

File this one under "projects to complete after we buy a house":

This portable fire pit is just really pretty awesome. It looks cool, it is relatively inexpensive to make, and it can be used indoors or out!


Thursday, August 19, 2010

Blog love and a confession


How did I not find this blog sooner? She is undertaking this project for a year and is already on day 263! I have a lot to catch up on!

But seriously, how creative and crafty is this woman?! I have no idea how she looks at a pretty gosh-darn ugly dress and envisions it being something that looks great on her. (And, of course, there is the fact that she has the sewing skills to pull off her ideas.)


I will admit it: 
I have no patience for thrift stores.

There it is. Out in the open. 

I want to like thrift stores, I really do. I go into them every once in a while in search of a particular item (which is likely my problem), but I get frustrated when I can't find what I am looking for. I have donated stuff to various thrift stores and Goodwill-type organizations for as long as I can remember. And that fact alone should also let me know that there are other people like me who are donating items. Items that are clean, barely used, etc. But for some reason, I have this idea in my head that a lot of the clothes are dirty/stained/not worthy of entering my wardrobe.

I need to get over it, I think. I can hopefully gain some inspiration and confidence from the New Dress a Day project and go into a thrift store with an open mind. Perhaps one of these days I can maybe even share my own ugly-dress-to-awesome-dress transformation.

But I need to gain some patience with thrift stores first.

Friday, July 9, 2010

More fun projects...

I really need to stop looking around the blogosphere and finding projects that I want to do, because, honestly, I think at this point, I probably have enough projects to keep me busy through several years!

Nevertheless, some of my latest finds:

Plans for the weekend include hitting up some of the local thrift stores to see what fun items I can find and repurpose! Here's hoping I find some bed side tables!


Thursday, July 8, 2010

Re-Design Ideas

The bedroom redesign will hopefully be happening in small steps, but there probably won't be much ground until we actually buy a house -- at least a year down the road. However, here is at least one project I would like to do when we do start the redesign:
(The only problem will be that our dog likes to sleep under our bed, so it will be pretty hard to keep dog hair off the bed skirt!)

Also, these prints are pretty much the exact color scheme that I would go with: blue, gray, and brown. Plus, I love the fluffy part of dandelions, so these would be great to hang on the wall:
Seeds of Freedom Print Set 

Saturday, July 3, 2010

Refashion: Long-Sleeve Tee into Open Cardigan with Pocket

I will be the first to admit that some clothes stay in my closet for far too long. I think the oldest item of clothing that I have I bought from the GAP in 1997. Needless to say, it is time for a fairly major wardrobe update, but I also wanted to refashion some of the items and give them at least a little bit more life.

So I started with a long-sleeved tee (that I remember taking with me on my high school trip to France) and decided to do something new with it. Enter the open cardigan. Because it is summer in NC, I haven't been getting as much use out of my regular cardigans because it is really just too hot! The ones that are light enough to wear generally are left unbuttoned, so I figured, why not just make a cardigan that is supposed to be open?!

If you want to make one for yourself, follow my first tutorial!

What you'll need:
  • Long-sleeved tee shirt
  • Scissors
  • Measuring tape/ruler
  • Pins
  • Sewing machine
  • Iron (optional)

1. Start with a long-sleeved tee that still fits, but that you are willing to use for a new purpose.

2. Lay it out flat and measure from one side seam to the other. Figure out the middle point and put a mark there. Continue up the rest of your shirt marking the middle point so that eventually you can cut a straight line. (Or, if your shirt is slightly ribbed, like mine was, just keep your eye on the correct rib and cut carefully up the middle.) You should end up with something that looks like this:

3. Put on the shirt and figure out where you would want the sleeves to end. I measured to the middle of my elbow, so once I hemmed the sleeves, they stop just above my elbow. If you want your sleeves to be longer, measure them longer. (I found it easiest to just measure from the armpit and then cut straight across.) Do this for both sleeves.

4. I decided that I wanted my cardigan to have pockets, so I used the bottom part of the sleeves that I cut off for that fabric. Flip the bottom sleeve fabric inside out and cut out the seam, so that you end up with one solid piece of fabric.
5. Since the bottom of the sleeve is already hemmed, I used that for the top part of the pocket (hey, anything for a few less stitches!). I used a food storage container to trace my pockets because I liked the shape, but feel free to use whatever shape you want for your pockets. (From a sewing perspective, it would be easiest to do just square pockets.) If you don't want to make pockets, you could use the extra sleeve material to make ruffles/flowers/a braided edge/whatever your heart desires. I just happen to really like pockets.


6. (I didn't take pictures of this next part. Sorry!) Now you have all of the pieces that you are going to need. If you like the look of the raw edges, don't do anything else with the cuts that you made down the middle of your shirt or on the sleeves. I chose to hem the middle cut and the sleeves with just a straight stitch. Be sure to anchor your stitches by going back and forth a couple times with your sewing machine, especially on the parts that are already hemmed from your original shirt. I also ran a stitch around the outside of the pockets to make them easier to turn under in the next step (the zigzag stitch was just for decoration since I was sewing with a contrasting thread color).

7. I ironed the outside seams of the pockets to make them easier to pin and sew on later.


8. Pin your pocket on your cardigan wherever you want it, sew it on, and voila! You're done!


(I originally cut out two pockets, but I decided that I just wanted to attach one at this point. I like the asymmetric-ness of it.)

I was going to model it for you all, but I am still in my pajamas this morning, and frankly, that is okay by me!

I am linking to


Friday, July 2, 2010

My first tutorial... maybe?

So, I started a project this past week that I am hoping to finish up either tonight or tomorrow. I have taken pictures along the way to show how I made it. The hope is that I will get everything done and edited so that I can post over at Along for the Ride tomorrow!


Tuesday, June 29, 2010

More re-fashions and DIY Inspirations

The final result of this project is so cute, but may be beyond my beginner sewing skills at this point: Ruffled Top from Mens Shirt
This shirt could be a little more along the lines of my sewing abilities: Braided Tee Refashion
I would probably make this from a non-shiny fabric and make it a bit longer so it was work-appropriate (but I love pockets!): Pocket Skirt
And another cute skirt project from a button-down men's shirt: Striped skirt
A cute ruffle-y tank DIY: Ruffle Tank
I should find some old sheets to try out this cute full skirt: Circle Skirt

Friday, June 25, 2010

Space-saving and crafty!

Some people are almost too creative for their own good! (Translation: Why didn't I think of this?!) I would love to have a couple of these for our bedroom... and when we have extra guests, just bring them downstairs!


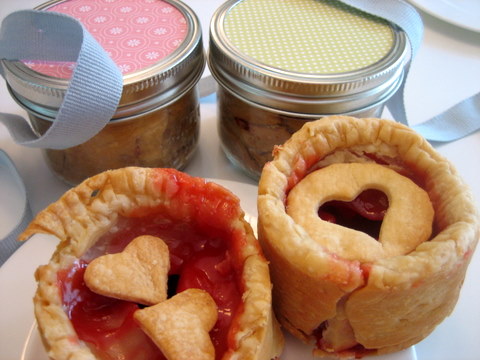
Pie-in-a-Jar!

This is such an amazing idea! I would have never known that you could bake mini-pies in mason jars!


Thursday, June 17, 2010

Inspiration

There are so many people out there making super-crafty things! One of these days I will get around to being crafty on a more regular basis. Until then, I'll just start my on-going list of what I would like to make at some point.

For as much layering as I do, I should make some of these: Anti-layer tube top 
I also am loving the J-Crew knock-off here: J-Crew knock off
This coffee cup cozy is super cute and would make a great gift: Coffee Cozy
I was thinking that this could be cute on a jersey dress: Paisley T-Shirt
This could be a really cute summer skirt: Split Skirt
When I (or any of my friends) have a baby, I would want to make some of these: Ruffle Onesie or these: Tie Onesie
This is a pretty cool idea: Milk jug curtain

Enough ideas for today... it would probably take me several months to get all of those projects done anyway!

Friday, March 12, 2010

Crafty!

So, I have been working on a few small craft projects recently. I made a few more of the ribbon necklaces like I posted about before and gave them to a couple of my co-workers.


I also followed A's DIY tutorial over at academichic.com to create an embellished t-shirt for spring. I got the base shirt for about $10 at Target and cut up an old tank top that didn't really fit anymore (and was practically the exact same color) for the flowers. The flowers are about 3 different sizes and I attached 5 total, working from smallest by my shoulder to largest at the bottom. The shirt was definitely a departure from my general wardrobe, but the shirt was the perfect pop of spring on a rainy Friday at work! Perhaps I will add some more fun embellishments to some other t-shirts for this spring...

It has been fun to stretch my creative and artistic side a bit more recently (especially when I spend most of my work days doing very similar tasks). We'll see what fun project I come up with next! I did pick up some canvases to potentially make some art for my office walls...

Saturday, February 20, 2010

Crafting

Last weekend, I channeled my inner LCD, who is probably the most creative person I know.

I saw this necklace and first thought, "That is really cool. I want one." And then I thought, "Wait, I could probably make that!"

So I bought some ribbon and some beads and this is what I ended up with:


The top one is brown ribbon with large blue-gray glass beads, and the bottom is purple ribbon with medium-sized silver beads. They were really easy to make and could really be tailored to whatever color combination and bead texture you would want. I already have a few coworkers who either want to learn how to make them or just have me make some for them!

Monday, November 23, 2009

I feel a project coming on...

I think I might have to make a few of these for my office. They seem like just the right thing.


I think I may go with three square-ish canvases and a greenish-blue theme. We'll see where this goes!

(images and inspiriation from Jess at http://makeundermylife.com/ )
Related Posts with Thumbnails